Teaching a client to do pull-ups, a gold standard exercise embodying bodyweight strength and endurance, is a process. Assessing mobility and addressing restrictions with releases and drills are the first two steps before teaching the actual pull-ups. When your client is ready, implementing a program using progressive regressions is the best way to ensure success.
Using assistance in the form of barbell racks, suspension bands, resistance bands and trainer-spotting in a progressive fashion can dictate the difference between someone who can efficiently pull up all of their body weight and someone who can’t.
Starting from Zero
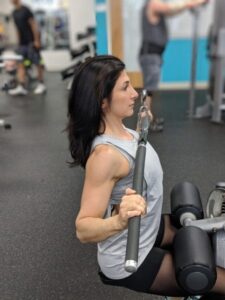
Be sure your client has ideal form on the lat pull-down with heavy weight. This means you may want to calculate her 1RM and have her attempt it. Can she get the weight to her chest without breaking form? If not, lower the weight and work in a range where form can be maintained in the 5 to 8 rep range and attempt the 1RM assessment again.
Pull-Up Regressions
There are many effective preparatory movements that can be programmed to learn pull-ups. I’m listing my favorite “regressions”, exercises that are modified from the target movement, and those which are most easily executed in almost any setting. (The rack exercises can be substituted with a suspension trainer. I have used PVC pipes, BodyBars or even lightweight barbells threaded through the handles of the suspension trainer to simulate a barbell rack.) The intent is that a coach or trainer is guiding a client, but anyone endeavoring to accomplish bodyweight pull-ups can follow the progressions.
Scapular Depression
As was described in the scapular motions assessment, every start of every rep of every pull-up or pull-down motion should begin with scapular depression. Working in this small range will ensure that scapular strength and control is maintained for every major back movement.

- Start at the pull-up bar with a box under feet with knees slightly bent, or arrange a TRX or Barbell high enough for arms to fully extend and torso to remain perpendicular to the floor.
- Knees should be at least somewhat bent, but feet should be in contact with the floor throughout as below to begin.
- Shoulders should begin in an elevated position.
- Instruct client to depress shoulders without bending elbows at all.
- Hold depressed position for 2 full seconds and slowly return to start.
*Lower body can provide enough assistance so that a full range of motion is accomplished and at least 15 reps can be completed to near failure.
Hang
Grip strength will likely have to be addressed while working on strength and form. If you can’t hold on, you can’t pull up. Start by having the client climb up to the pull-up bar and hang with a thumbs-over-index finger position for as long as possible before grip fails. Work up to at least 30 seconds.
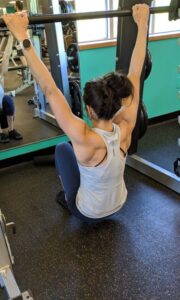
Isometric Hold
With all strength moves, our Type I fibers are the first to fatigue, so improving endurance strength is a natural place to start. While doing light weight, high volume training is another method to building muscular endurance, an isometric contraction will ensure the end range of the motion can be maintained.
Get the client into a chin-up position, palms supine (facing the body).
- Similar to the hang, the client will step up to the bar starting at the top of movement, with chin above the bar.
- Work on an isometric hold in this position for at least 30 seconds before moving on. While working on this progression, be sure to keep increasing lat pull-down strength.
*This can be done at the rack or with suspension bands by tucking knees up away from floor. However, be aware that some additional energy will be expended on holding the legs up as well.
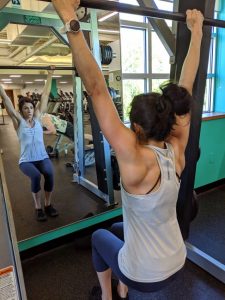
Suspension Band or Racked Barbell Upright Pull
If you have access to a Smith Machine or have suspension bands, both work well to help self-regulate leg assistance, similar to a weight-assisted pull-up machine and also nail down the mechanics of the pull-up. Shorten the bands so that the client can reach the handles with fingertips while sitting upright on the ground below. Butt should be hovering above floor, not resting on it.

- Have the client grab the bar or handles and hang with knees bent and feet flat on floor.
- After a warm-up set with a lot of help from the lower body, instruct the client to use as little help as possible from the legs early on in the set, using mostly upper body strength to pull up until chin comes right above the level of the bar, maintaining strict form. This means, the shoulders stay depressed and scapulae firm against ribs (not winging) as the arms pull.
- As strength increases, encourage the client to lift the feet off at the top of the pull-up position.
Work towards 1o strict reps before progressing.
Negatives
Eccentric strength training allows a muscle to handle higher loads, and therefore, creates greater strength gains more quickly. Negatives are performing only the eccentric motion of the exercise, while assistance is given to the concentric motion. In this case, the client can either jump or the trainer can provide manual assistance, if plausible (this means the trainer needs to assist at least 80% of the concentric phase for the entire set).
- Set a step beneath the pull-up bar, tall enough so the client can hold the bar with arms fully extended and bent knees with the feet are resting on the step. (You may also set up a Smith Machine or suspension bands as in the above Upright Pull)
- The client should “jump” up to the end position of the pull-up, hold for 1 -2 seconds, and then slowly lower the body until the feet reach the step. (Alternatively, the trainer can push up on the client’s ankles or low back providing maximal assistance)
- Start with a five-second descent and work towards 15 seconds.
- Repeat three times for a full set.
Band Assisted Pull-Ups
Bands can be a useful tool to build confidence and muscle memory while learning to perform pull-ups. However, recognize the limitation here is that the greatest assistance occurs at the beginning of the movement where the mechanics are hardest to execute and strength is generally most lacking given the fully lengthened position of the muscles.
You need a large, looped resistance band that can provide adequate assistance on the pull-up. Generally, one that can assist 10%-20% of the client’s body weight should do the trick, which means, you really need to know your bands’ resistance level.
- Start with two feet in the band with the top looped around the bar.
- Aim for a slow, controlled rep with a 2-2-2 count.
- After the client can perform 3 sets of 10, then progress to just one foot in the band.
- Once that approach is mastered in the same rep range, move on!
Trainer-assisted Pull-ups
It’s time to see how much your client has in the tank.
- Have the client step up to the bar, grip it and remove the step (if it’s so high that a step is required to reach it!).
- Encourage the client to engage the core and keep the legs straight and together, rather than crossed at the ankles, which is a compensation for an unengaged core.
- Pull up!
- If the client can do one, you’re officially in business and now it’s just a matter of getting stronger and increasing reps.
- When form starts to fail or fatigue sets in, assist by pushing up from the bottom of the rib cage with the heels of your hands.
- Alternatively, you can have the client bend knees and assist at the shins.
- Attempt to give as little help as is necessary for the client to perform the rep with good form.
- Another progression technique is to take a 15-second rest after failure and to attempt additional reps. This allows the trapped blood time to clear and the muscle an opportunity to squeeze out more reps.
Give as much help as necessary to achieve 5 pull-ups. The next set may require assistance from the get-go, but be sure to provide only the bare minimum needed to achieve the pull up with good form.
There are some other tweaks that can be made to transition into strong, body weight pull-ups, such as adjusting grip width and hand position. Taking a narrower grip reduces the moment arm of the movement (a topic for another blog!), effectively reducing elbow torque and making the pull-up easier to perform.
Similarly, taking a neutral grip with palms facing each other (a common option at pull-up stations), recruits both heads of the bicep as well as the brachialis and brachioradialis, i.e., you’re getting a lot more help from more muscles.
And finally, programming chin-ups into your pull-up routine will help round-out overall pulling strength. Chin-ups are even heavier on bicep recruitment than a neutral grip pull-up.
Finally, congratulate your client and yourself at working together in achieving this impressive goal! Stay tuned for ways to make pull-ups even harder with advanced regressions.