It’s helpful for certified personal trainers to understand the bone structure and joints of the pelvic girdle given how much movement takes place through the hips, and also, how many issues tend to surface with clients’ form, function and even pain issues.
Naming the Basic Pelvis Parts
At the very least, every trainer should have a grasp on the basic bone structure of the pelvis. The pelvic girdle refers to the bones that create a “bowl”, so to speak, around the lower abdominal organs, or pelvic viscera, enclosed beneath by the muscles of the pelvic floor, and creates the space known as the birth canal in females.
It consists of the:
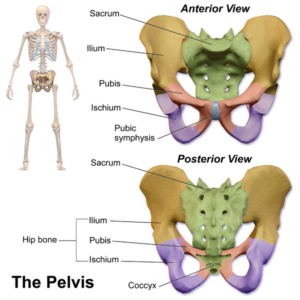
Ilium: Posterior, superior bones in yellow that are most prominent when referring to the “hips”.
Ischium: The inferior, wing-like bones in purple, that house the acetabulum, or the “socket” portion of the hip’s ball and socket joint, that articulates with the head of the femur.
Pubis: Irregular-shaped, anterior bone in red, that articulates with the pubic symphysis, a cartilaginous joint.
Sacrum: The posterior bones in green that form the base of the spine and articulate with the ilium. The coccyx, or tailbone, is the most distal portion of the sacrum.
When we talk about pelvic tilt tendency, or sacroiliac pain, or even reference points like the Anterior Superior Iliac Spine (ASIS), having a working knowledge of the integral bones and joints make genuine understanding the aforementioned conditions/ landmarks truly possible.
Detailed Pelvic Landmarks: Getting More Specific
Take a good look at the illustration below. How may of those terms are you seeing for the very first time? Do you have to memorize all of these bony processes and landmarks to be an effective trainer? Of course not. But understanding this level of skeletal anatomy will make it easier to understand muscle and ligamentous attachments.
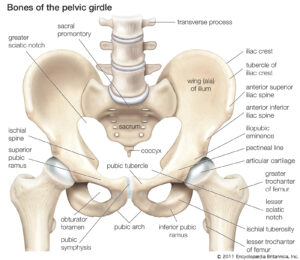
For instance, the obturator foramen….it’s just a set of holes in the ischium, maybe not something worth noting, or so it would seem. But deep hip rotator muscles pass through there (like, maybe the obturators??), and knowing which ones do and how they work when the hip is flexed or extended, gives you a much better grasp on how those muscles function, and will likely help you remember them better.
How about the components of the femur? The head of the femur is what articulates in the socket, or acetabulum. The greater trochanter, is the big bony protrusion on the lateral, superior thigh, often prominent on women with wide hips.
The lesser trochanter, however, can not be palpated at all, but is an attachment point for several hip muscles.
Also, you can see clearly where the ASIS is in the illustrations and then manually feel for it on your own pelvis. The Anterior Inferior Iliac Spine (AIIS) is not one you can palpate, but you can see where it is located in the diagram.
The PSIS is visible in the lateral illustration. This is another one you should be able to palpate and locate on yourself and clients.

If the PSIS is lower, they are exhibiting a posterior pelvic tilt in a static posture.
The ischial ramus is what we commonly and affectionately refer to as the “butt bones” or “sit bones”. If you sit with legs extended, the inferior pubic remus is what you feel in contact with the ground.
The Muscles of the Pelvis
After getting a pretty good feel of the pelvic landscape, you can start to line up the muscles you are most familiar with to where they attach on the pelvis. Knowing this is what helps you fully visualize how the muscles are meant to function. What motions are they intended to create based on the lines they make from bone to bone?

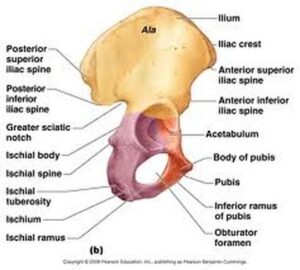
Check out some of the attachment sights in this image. At the very top of the iliac crest you’ll see the abdominal muscles and other core muscles, like latissimus dorsi and quadratus lumborum attach.
But there are less obvious, more hidden muscle attachments that, when located, may help understand movement a little better. For instance, did you know the iliopsoas attaches to the lesser trochanter? If this muscle that snakes around the medial aspect of the femur, extends up into the pelvic girdle attaching to the lumbar vertebrae (psoas) and the inferior wall of the ilium, what other motion besides hip flexion does might it perform (as opposed to if it had instead attached to the greater trochanter)?
Really try to visualize this: If the psoas (clearly pictured on the left side of this illustration) shortens as it is sort of stretches over the front of the ischium and is pulling on the medial aspect of the femur, besides getting pulled upwards, what rotational force might be exerted on the femur?
External rotation!
Just a bit, mind you, but it’s there. And why might that be important to know?
If someone has a tight or overactive psoas (maybe you just determined that they have an anterior pelvic tilt by performing the static assessment mentioned above, indicating the psoas is short and overactive) and you coach them to stretch it, your first instinct may be to just put the hip into extension, as in a deep lunge and hold. What you might not notice is that the client compensates by placing the knees too wide, slightly externally rotating the hip, and probably arching (extending) the lumbar spine.
While this will get at the iliopsoas a bit, it’s not the most optimal position to get an effective stretch. The best way to stretch a tight psoas is by stacking the hip under the knee while kneeling with the other leg in front, both knees in 90 degrees of flexion. Rather than lunging or leaning forward, instruct the client to perform a posterior pelvic tilt, or tuck the tailbone under, (keeping a straight perpendicular line from knee to shoulder) and squeeze the glute. Holding that statically for 30 seconds or more will help release a tight psoas.
Embracing the Big Picture
While trainers with a fresh cert in hand might feel overwhelmed trying to tackle more intense and specific anatomy fundamentals such as these, it’s something to always keep striving for as a fitness professional who has every client’s best interests at heart. Gaining knowledge and deeper understanding of the human body and how it moves (kinesiology), can only enhance your expertise as a personal trainer and keep propelling your business forward.
Share this knowledge with your clients and they will appreciate your value as a wellness coach even more! What other muscles with attachments in the pelvis can this pelvic anatomy lesson bring into focus for you?

References:
www.physio-pedia.com/Pelvic_Floor_Anatomy
www.brookbush.com
Williams.SM: https://www.researchgate.net/figure/Fig-S10-Pelvic-tilt-as-measured-in-modern-humans-Pelvic-tilt-is-measured-as-an-angle_fig9_236904823